Shopping cart (0)

Cart

  • Cart empty
  • Total 0,00 €
Show Cart
English

English (33)

How to properly look after your tools

How to properly look after your tools

Both manual and electric tools require essential maintenance at home. Keeping them in good condition is essential so you can get your full money’s worth from your investment and enjoy using them for as long as possible. That is why today we’d like to give you all the advice you need to ensure all your tools are kept in the best condition possible.

Read more...
Main differences between hammers and mallets for sculpting

Main differences between hammers and mallets for sculpting

There are various different types of hammers and mallets for sculpting, although they are not all used for the same purposes. If you only recently started using your own tools for sculpting, you may be asking yourself: “when should I use each of them?” If this is the case, don’t worry, because in this post we will help you to understand the main differences between hammers and mallets for sculpting, and which you should choose for each case.

Hammers

The working part of the tool is usually made of steel, while the part that is used for holding the tool is generally made of wood or rubber. Although the most well-known type of hammer is the one with flat ends, as well as another kind with a kind of downward curve, there are other types of hammers that are more useful for sculpture.

  1. Manual hammers for bush hammering. These kinds of hammers are used for bush hammering stone. If you’d like to know more about this technique, there is a post on our blog where we talk about it in depth.

  2. Splitting hammers. As the name indicates, these hammers are designed specifically for splitting stone into two blocks.

  3. Crandall hammer.This unique hammer is ideal for adding texture to blocks of sandstone.

  1. Toothed stone axes. This is one of our most popular tools. At least one side of its head will be toothed and it is used primarily for working on the edges of a piece of stone.

Mallets

As opposed to hammers, mallets usually have a rounded head made from different materials, such as steel or white beech, although there are some with a flat head. Their handles are usually shorter than those on hammers and they are commonly used as a tool for striking other sculpting tools, such as chisels, for example.

  1. Round mallet. This mallet has a rounded striking surface that enables you to make solid strikes easily.
  2. Round white beech mallet. This mallet is hardened to give it more power, making it more effective.
  3. Ergonomic mallet. In addition to its hardened steel bell, this type of mallet also has a fully ergonomic wooden handle for a better grip.

How can you use it safely?

It’s very important to take precautions when working with this tool. It is essential that you minimise risks, to protect yourself and anyone else nearby. We will outline some guidelines that you should follow:

  • Make sure that the hammer or mallet you’re using is the correct size and weight. If it is too heavy this could cause unnecessary accidents.
  • Before beginning, check that your tools are in good condition, that they are not broken, that the handle and head are properly attached, etc.
  • Protect yourself with glasses, gloves and a mask to work safely.
  • Once you’ve finished, make sure you clean up properly and tidy everything away, including your tools. It is essential that you clean your tools after use, both the heads and the handles, to ensure they are properly maintained.

We have all the tools for sculpting stone that you could possibly need.

At Rock&Tools we are specialists in the sale of high-quality tools for sculpting stone. If you’d like to start making your own pieces and you have a clear idea of what you’d like to do, but you’re not sure what tools you should be using, ask us and we can give you personalised advice to ensure that you choose the perfect option for you. We’d love for you to join our community

Read more...
How to break or cut stone correctly

How to break or cut stone correctly

Learning to cut stone correctly to produce the size you want and form your pieces is an essential skill for any sculptor, whether they’re an amateur of a professional. Cutting stone can be a slow process but, although it requires a lot of work, doing it correctly ensures that the piece will last a lot longer. We’ll tell you all you need to know to cut stone properly, and the different methods you can use.

Cutting stone with wedges and shims

Cutting stone with wedges and shims (also know as V cutting) is the traditional method for splitting blocks of stone in a simple way. The objective is to obtain different volumes with the flattest sides possible.

The most important thing when using this method is to follow the grain of the stone that you’re cutting. If you do this, you won’t need to use as many wedges and shims, as the whole operation will be more simple. However, if you decide to cut perpendicular to the grain, the process will become more complicated and you’ll need to more wedges and shims.

To do this, first you’ll need to make holes in the stone, then use the wedges in combination with two steel shims with sharp edges, which will help the wedge to split the stone apart. The size of the wedges and shims you use will depend on the size of the stone that you’re splitting. For example, to split a piece of stone of 24-36 cm in size, wedges and shims of 13x70 mm in size may be sufficient.

The holes should be made in a straight line, with a space of around 10 cm between each one, and they should be in a V shape, with the widest part of the hole towards the outside of the stone, becoming more narrow inside the stone. Once you’ve made the holes, place the wedges and shims inside with the ears pointing in the direction of the fracture line, and then strike each one successively (strike the first one, then the second, and continue like this until you’ve hit them all, then start over). Keep doing this until the stone eventually opens up down the middle. Bear in mind that the hole you make should be deeper than the height of the wedge, to prevent it from hitting the bottom and breaking or deforming the stone. This video will give you a simple explanation of the entire process.

Cutting stone with machinery

For this technique you will need a grinder or a circular saw, and you should ideally use a diamond disc. The most important thing is that you accurately measure the area you want to cut and mark where you’re going to make the cuts. Put on protective equipment before you start, such as a mask and hearing protection.

Once you’re all ready, trace a straight line across the stone with the grinder, going over it several times, then do exactly the same on the other side of the stone. Once you’ve done this on both sides, finish cutting the stone with a chisel, as this is the only way to achieve a completely straight cut. This final step is only necessary if the stone is very wide, as with smaller pieces of stone an electrical tool may be sufficient.

If you want to produce less dust when cutting the stone, you can slightly moisten the outside of the disc (do this carefully though, as remember that it’s an electric tool), and you’ll see how this helps to cut easier and also produce less residue.

Cutting stone with a splitting hammer or a Stone Buster

One final option is to use a splitting hammer to complete this task. This hammer has various different uses, but it is most commonly used for splitting stone. The simplest way to use it is to just strike the stone with the hammer until it splits. But if you’re looking to achieve a more precise cut, you should place it on the point where you’d like to split the stone, then use a second hammer to strike it until you obtain the desired result. This video will give you a visual explanation to help you understand the process better.

Tools for cutting stone

If you’re interested in learning more about the exciting world of sculpture, each week we will be releasing a new post to help you discover more about this art.

If you’re looking for tools to start sculpting and designing your own pieces, we have everything you could need! And if you have any queries, we would be delighted to help you with whatever you need.

Read more...
How to improve your creativity through art

How to improve your creativity through art

Creativity is an essential tool for artists of any discipline, which anyone who works in the arts professionally will attest to, whether it be cinema, painting, sculpture or any other profession related to one of the seven arts. However, we don’t always pay enough attention to how art and various artistic disciplines can help us to improve our creativity, even if we don’t do them for a living.

What is creativity?

Creativity is the ability to invent or create. Or in other words, the ability to generate new ideas or new concepts. Someone can also be considered a creative person if they are capable of resolving problems or conflicts in an original and unconventional way.

These qualities that we just mentioned are useful in the world of art, but also in the corporate sphere and even in a family environment. Would you like to learn how to boost your creativity?

How to increase creativity

Since people with creative personalities tend to look for original solutions to specific problems, companies are increasingly looking for candidates with high levels of creativity over and above any other skills or expertise. Of course, having a creative mindset also helps you to experiment, go one step further and exceed your own expectations by producing better and better sculptures. What can you do to improve your creativity?

Dedicate time to thinking and imagining

Set aside at least an hour every day just for yourself, forget all your worries for the day and let your mind flow. You might find this difficult at first, but you’ll soon see that, with practice, it will get easier and easier. Come up with a topic you find interesting and think about it in detail.

Ask lots of questions

Ignore those that say curiosity killed the cat, you should ask as many questions as you can! Asking questions about various aspects of life is good practice, so that, without realising, you end up thinking about everything you want to do. Curiosity is what leads us to think about ourselves, don’t forget that.

Games

Most games are great for promoting creativity, whether they be board games, kid’s games or video games. This is because most of them require you to come up with ways to tackle various different problems and challenges. As such, playing (in moderation, of course) will help you to develop your creative skills.

Take some risks

If there is one thing that creative people are not known for, it is doing the same thing over and over again, they’d much rather dive into the unknown. Remember that making a mistake doesn’t mean you’ve failed, it just means you’ve discovered that one path doesn’t work, a valuable lesson that will serve you well in the future.

Relationship between art and creativity

Art is a powerful tool for stimulating your creativity. Why is this? Well because art, regardless of the discipline, helps you to achieve all those things we just mentioned. To start with, dedicating a part of your time to an artistic activity helps you to break with routine, free your mind and immerse yourself in your own thoughts. This state of “relaxation” is also necessary to help you think calmly and fluidly. Rarely do creative ideas emerge from a stressed mind.

Another point to bear in mind is that, if you think about it, there is no one right way to represent an idea or a state of mind. If that were the case, all paintings, sculptures and films would be exactly the same. Looking for your own way to interpret something that you want to convey is without a doubt helpful for stimulating creativity, bringing you closer to a unique and original way of being and communicating. Art is the perfect way to convey your own emotions, so get stuck in!

Furthermore, learning about art history, how it evolved and how different artists have innovated and created throughout history can also be very inspiring, opening up new horizons and helping you to become more creative in your daily life. Great!

“Creativity is intelligence having fun”

This famous Einstein quote could not be more accurate. At the end of the day, creativity is a skill that our mind uses to come up with innovative solutions to issues that no-one else has managed to resolve before. And it is in this process that intelligence can really have some fun.

If you’d like to become more creative, take advantage of all the benefits that art offers for developing your creativity in a fun, interesting and inspiring way.

We are specialists in tools to help you begin sculpting and designing your own stone sculptures. We have everything you could possibly need! So if you think this artistic discipline could help you begin developing both your artistic side and your creativity, what are you waiting for? And if you have any queries, we would be delighted to help you with whatever you need.

Read more...
What is a chisel and what is it used for?

What is a chisel and what is it used for?

Chisels are one of the most commonly used tools in the world of sculpture. Aside from the art world, they are also used in masonry and construction, to prepare surfaces before they are worked on. Would you like to know more about this tool?

What is a chisel?

A chisel is a tool used for carving materials, striking them with the aid of a hammer or mallet. Although it is a fairly straightforward mechanical tool that has been used for many years, it is still very commonly used today.

In fact, this tool was even used by primitive humans, when they were generally made from stone, but now they are manufactured using steel.

What is a chisel used for?

Chisels are used cold and, as we already mentioned, always with assistance from another tool, such as a hammer or mallet. This is because chisels are specialised tools for cutting and roughing out other materials by striking them.

Chisels have two main purposes: breaking up materials and removing shavings from a material. It is precisely for this reason that chisels are used for cutting concrete, for opening up holes and carving and finishing pieces, among other purposes.

Parts of a chisel

Although there are various different types and models of chisel available, they are usually made up of four different parts as a general rule.

First there is the head. This is the part that is hit by the striking tool, whether it be a hammer or a mallet. It is at the far end of the chisel.

There is also the handle, which allows the sculptor to hold the chisel comfortably and direct the impact when it is struck. Next is the wedge, which is where you will find the cutting part (the flat areas of the chisel).

Finally you have the cutting edge, which is the part that is responsible for delivering the impact to the piece you are working on.

Types of chisel

Depending on the type of application they are being used for, chisels can be organised into the following categories:

According to how they are used, we have:

In terms of the material they’re made from, we have:

  • Steel chisels.
  • Carbide chisels.

This second type is a bit more expensive than the steel alternative, but it is worth it in the long term as it will last longer and allow you to work with materials that are up to 100 times harder.

How are chisels used?

As you might imagine, they are used in a fairly simple way. All you need to do is hold the chisel in your hand, position the edge against the area that you want to cut and use your other hand to strike the other end.

To achieve a clean cut, we recommend that you position the chisel at a 90º angle, fully perpendicular to the surface. However, if you’re looking to make a groove in a brick wall, position the chisel at a 65º angle, or if you’re removing rivets or protruding pieces of stone, you’ll want to hold it at an angle of less than 45º.

Chisels and tools for sculpting stone

If you’re interesting in learning more about chisels and other sculpting tools, this is the community you’ve been looking for! Let us know what you love the most about the art of sculpture, what sparked your interest and when you first had a go at making your own piece. And if you’ve come to this blog because this is the first time you’ve taken on a challenge like this, then welcome! You’ve taken the first step into one of the most exciting worlds out there.

If you need tools to get started with sculpting and designing your own pieces, we have everything you could need! And if you have any queries, we would be delighted to help you with whatever you need.

Read more...
How to make a marble sculpture

How to make a marble sculpture

Are you passionate about the world of sculpture? Would you like to create your own pieces and produce your own pieces of art just like Michelangelo himself? Great! As you can see, this is an art that we are passionate about and our objective is simple: provide artists with all the best sculpture tools they could possibly need. And it is precisely for this reason that today we would like to give you a step-by-step explanation of how to make a marble sculpture. Shall we get started?

How to sculpt from marble

Today’s artists still use the same techniques that were used by one of the world’s most famous sculptors, who we have already mentioned in this post: Michelangelo. It is important to note that, before starting any sculpture, it is essential to have a good visual concept and a plan. Do you have this ready? Perfect, well now we can move onto the next steps. Let’s go!

Step 1: the mould

The first thing an artist should do is make a mould from clay or plaster, which they will use to model the concept or figure they’ve chosen. This material is ideal because it allows you to add all the details you need for your final sculpture. The clay or plaster model actually plays a very similar role to a sketch for painters, because it allows the artist to make or undo changes that wouldn’t be possible when sculpting stone, as once the stone has been carved, it cannot be undone.

Step 2: extracting the material

In this case we want to know how to make sculptures from marble, so that is the material we’ll be focusing on in this post. Marble is extracted from a quarry, where large blocks are cut and cleaned, and a supervisor will indicate how the material should be cut to be prepared for the sculpture. Wow! Sounds interesting, right? It is then cut into the appropriate dimensions so the sculptor can work with it easily.

Step 3: proportions of the marble sculpture

The resulting block of marble is moved to the studio, alongside the clay or plaster version of the sculpture that the artist wants to make. What for? Quite simply so that the artist can measure the proportions and transfer the measurements of the plaster version to the marble block. This will allow them to mark out the main mass of material and the limits of the shape being sculpted.

Step 4: roughing out and sculpting

The fourth step involves removing large areas of material from the block being sculpted, moulding it to end up with the approximate shape and size that the artist wants to work with. For this step, the marks that were made in the previous step to outline the shape will help to avoid removing too much material.

Step 5: the details

Once you have achieved the general form of your sculpture, you can start to add details and perfect your work of art. Once again, you will need to add all the measurements from your previous version to make sure that all the details of your marble sculpture are to the correct scale. For this step you will mostly be using chisels, rifflers and rasps.

Step 6: the finishing touches

Once you have completed the sculpture, you can finish it by rubbing it with oxalic acid to seal it and protect it from possible staining. The oxalic acid will also give it a shiny and transparent finish, adding more visual depth to the sculpture. And that’s it!

How are marble sculptures made

We hope that our step-by-step guide to producing a marble sculpture from scratch was useful to you. We would like to give a special thank you to José Luis, who sent us a video from Canal Discovery Max that covers this interesting topic.

Michelangelo believed that each piece of stone contained its own statue and that it was a sculptor’s job to discover it and give it form. What do you think? We could not agree more!

If you are looking for tools to start sculpting and designing your own pieces, we have everything you could need! And if you have any queries, we would be delighted to help you with whatever you need.

Read more...
What kinds of stone are used for sculpture?

What kinds of stone are used for sculpture?

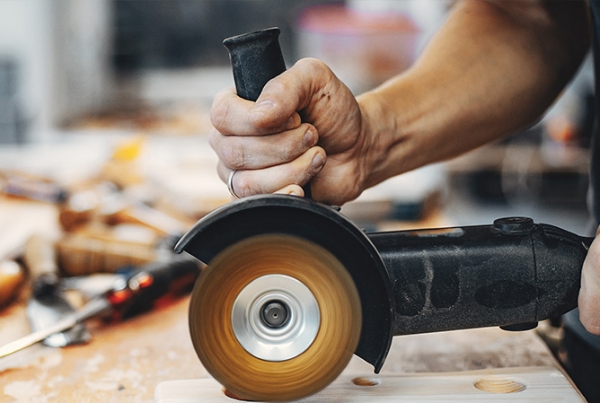
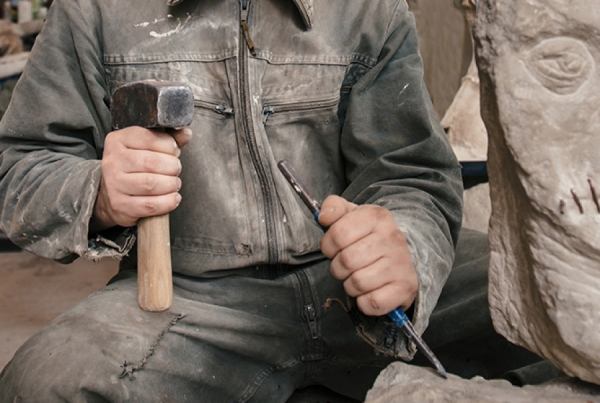
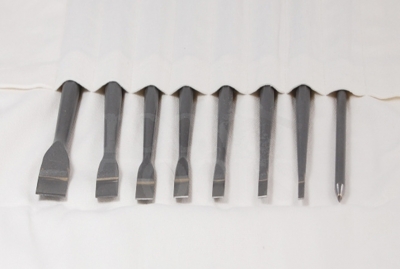
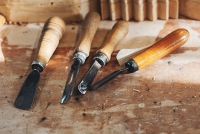
Artists can use stone sculpture to tell their own stories, express their feelings and make their mark on the world. Would you like to discover this world? Of course you would! Once you’ve learned about the tools for sculpting stone and how to work with stone, all that’s left to learn is what kinds of stone you can use for sculpture and how to work with them.

Shall we get started? Of course you would!

The best kinds of stone for sculpture

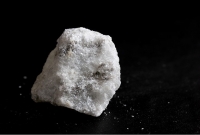
Alabaster, a fantastic stone for beginners.

Alabaster is one of the most popular types of stone in the world of sculpture, with artists appreciating it mostly for its malleable nature. It is also an incredibly beautiful material, with its translucent appearance giving it a particularly elegant finish. It is a white stone that is fairly soft, compact and with a marbled appearance. Its composition makes it very easy to carve, so it is perfect for beginners.

It was used in Egypt, Greece and China in ancient times for creating artisanal products, and in Spain it was used for producing sculpted altarpieces in religious buildings, such as monasteries and churches.

Limestone, for producing more durable sculptures

Limestone is a sedimentary rock largely made up of calcium carbonate, and it occasionally contains small quantities of other minerals, such as clay or quartz. Due to its fantastic weather-resistant properties, many of the sculptures and buildings made out of this material thousands of years ago have been preserved to this day. A great example of this in Spain is Burgos Cathedral, a very impressive architectural masterpiece.

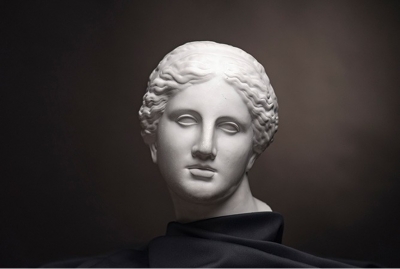
Marble, suitable only for the most experienced sculptors

Marble is a compact metamorphic rock that is submitted to high temperatures to reach a high level of crystallisation. Curiously, even though 90% of its composition is made up of calcium carbonate, it is the rest of its components that provide its colour and properties. It is the various colours found in marble that show us the other components that make up this small proportion.

Beginners should bear in mind that recently cut marble is easier to work with. However, it is important to note that marble that has been exposed to the elements will be harder, making it the better option if you want to use it outdoors.

Once it has been polished, marble will be left with a very smooth surface and will break very easily. In fact, we are sure that you’ve seen a marble sculpture in a museum with a missing arm or foot at some point.

Sandstone, a simple option for making sculptures

The way sandstone is formed is very interesting, to say the least. It is formed as a bed of sand sinks into the earth’s crust, where it is heated and compressed by the pressure from other sediments. Hot water also provides it with various different dissolved minerals, such as quartz and iron oxide.

Sandstone is generally fairly easy to work with for producing sculptures, but it does tend to wear down sculpting tools quicker than other materials. You may not have known this, but the majority of buildings in Salamanca are made from this type of stone.

Granite, the most elegant stone

Granite is a plutonic rock formed from quartz, mica and alkaline feldspars, and, although it is a very common form of stone, it is only formed in certain very special places.

This type of stone has been used since ancient times. In fact, the Egyptians used it for building columns, doors, lintels and even the King’s Chamber in the Great Pyramid of Giza. These days it is used for stonemasonry and for slabs sawn from large blocks.

As with marble, granite is a safe choice if an artist is looking to achieve an elegant finish. Granite is also very strong and durable due to the high level of quartz content.

Soapstone, a stone that can even be cut with a knife

Soapstone is a metamorphic rock composed mainly of talc and, to a lesser degree, quartz, mica, chlorite, iron and magnetite. After talc, soapstone is the second softest mineral available. However, it is highly resistant to heat and, precisely for this reason, it has been traditionally used for making cooking pots, pans and trays.

Since talc is its main component, it can be used for producing many different kinds of ceramic pieces for decorating buildings and homes. Interesting, right? Sculptors use it very often because it is so soft, so it can be cut easily, even with a knife or any other sharp tool.

The exciting art of sculpture

Did you know about all these types of stone for making sculptures? Although these are not the only types of stone that exist, they are some of the most common. Let us know if you have used any of them before or if you’ve seen sculptures made from them. And, of course, if you think of another stone that you would like us to include in this list, let us know! We would love to read your comments below.

Read more...
What is art therapy? Everything you need to know

What is art therapy? Everything you need to know

What do you know about art therapy? Art therapy is a form of treatment that uses art for therapeutic purposes. It has been shown that art can be a good vehicle for healing psychological disorders, treating mental blocks and personal fears, etc.

Although art therapy was initially only used for therapeutic purposes, today many people also use it as a technique to help with personal development, emotional expression and even self-knowledge. Would you like to learn everything you need to know about art therapy? Well keep reading!

The history of art therapy

Before humans even developed verbal language, they were expressing themselves in one form or another through art. If you think about it, humans were already portraying their everyday lives through cave paintings all the way back in prehistoric times, which has helped us to understand their customs many years later. Art helps us to explore ourselves, to show how we see life, what we worry about, what makes us happy, what interests us, etc. And, despite what many think, this tool can be used by anyone, not just artists or those who are “good at it”.

It was in the Classic Antiquity period when the therapeutic properties of art and its benefits were first discovered. People realised that art helped them to achieve the balance they needed in their daily lives and to maintain a healthy body and mind. Interesting, right?

However, it wasn’t until the 19th century that European psychiatrists began to take an interest in plastic art produced by patients diagnosed with various forms of mental disorders, analysing it and discovering that, as a communication tool, it was actually as effective as verbal language. The Viennese psychiatrist, Hans Prinzhorn, then argued that, according to his criteria, all forms of artistic creativity had the potential for the self-healing.

In the 20th century, art therapy eventually established itself as a profession, based around two main schools of thought: psychoanalysis and artistic education. Gestalt therapy is a particularly prominent school of psychology in this field.

How does art therapy work?

Art therapists are professionals who combine both psychology and art to treat their patients. Psychology, on the one hand, provides them with an in-depth understanding of the human mind, and of the behaviour, processes and development of human beings. But it is also important that they have expertise in various artistic disciplines, as they use a number of different techniques and types of art to work with their patients. And sculpture is of course one of the techniques used by these professionals.

Objectives of art therapy

Art therapy uses art as a means of communication. It helps people to express themselves or communicate their feelings through the creation of artwork. There are three main objectives to art therapy:

  • Communicating feelings that are very difficult to express.
  • Boosting confidence and self-esteem.
  • Making verbal expression more achievable.

These three objectives lead to a variety of different benefits, which we will outline next. What do you think they are?

The benefits of art therapy

But what actual benefits can be achieved through art therapy? In addition to helping us to express ourselves and understand ourselves better, art can also help with the following aspects:

  • Helping people to communicate when they have problems with communication.
  • Encouraging emotional self-awareness and helping to manage behaviour.
  • Improving quality of life.
  • Helping with rehabilitation and emotional education.
  • It is very effective for people who struggle to relate appropriately to their environment.
  • It has proved to be very beneficial for children and teenagers with learning difficulties.
  • It helps to treat the symptoms of attention deficit hyperactivity disorder
  • It boosts self-esteem.

The main benefit of using art as a form of therapy is that it is very stimulating and develops your creative side, as well as your capacity for lateral thinking. Art is also very useful for helping you to express feelings that can often cause a lot of frustration.

Art therapy and sculpture

As you know, sculpture is one of the seven arts, so it can also be used to achieve all the benefits we just mentioned. Modelling figures, giving them form, becoming absorbed in creative work, perfecting every little detail...

Various scientific studies have shown that art therapy approaches involving sculpture can significantly improve the quality of life of people affected by disorders as serious as Alzheimer’s disease or senile dementia and can help to slow down the process of cognitive deterioration.

However, as we already mentioned, you do not need to suffer from an illness or a communication disorder in order to enjoy the benefits of art therapy. Art, and therefore art therapy, can help you to achieve a higher level of personal satisfaction, boost your self-esteem, focus your attention, and become surer of who you are.

Did you already know all this about art therapy? Interesting, right? Let us know what you think about this technique and if you have had a go at modelling your own pieces.

We would be delighted to help you find all the tools you need!

Read more...
The art of sculpture at home

The art of sculpture at home

After the confinement, we're sure that you're more keen than ever to try out some new activities, to discover new passions or to simply improve the decoration of your home by adding an artistic and personal touch. Maybe sculpture could be that new hobby to help you develop your creative side and keep you entertained over long periods of time. We're going to tell you why we think you should give sculpting a go at home. Read on to find out more!

How to make sculptures at home

For a simple way to make a sculpture, the easiest solution is to make a mould out of clay or plaster. These materials are more pliable, so it's easier to add details.

Next, choose a block of stone in a size that is slightly larger than the final sculpture you're looking to end up with. Measure the proportions, then take the measurements of the plaster mould and transfer them to the block of stone. You can then move onto the roughing out, which involves removing large pieces of the block to end up with a shape and size similar to the final sculpture.

Finally, once you've formed the general shape of your sculpture, you can now begin to add more detail and refine it using more precise tools. If you'd like to learn more about how to make a marble sculpture step by step, you can visit our blog post where we discuss this topic in more detail.

Ideas for simple sculptures you can make at home

 If you're looking for simple ideas so you can make your own sculptures at home, we've put together a short list with a few simple suggestions suitable for beginners. Let's take a look!

A bust without too much detail, perfect for beginners

If you're a true art lover, you've surely noticed that busts form a key part of practically every museum's collection. Busts are a representation of a human being from the head down to around the middle of the torso and they usually use a lot of detail to depict features, such as the eyes, nostrils, ears and even the hair, which is why they can be difficult for a beginner. That being said, what we'd suggest is that you create a bust where you can make out the head, neck, width of the shoulders and how the shape tapers down to the waist, but without too much detail. So you'd basically end up with the external silhouette of a person. How does that sound?

A simple shape, like a piece of fruit

Choose a simple shape, such as an apple or a pear, then select a block with the measurements that you'd like for your next decorative piece. Do you have it?

Then let's get going! If it seems too complicated to achieve the round shape of most fruits, don't worry, as you can just leave this until you've gained more experience. What we propose in this case is that you “smooth out” its sides. Instead of forming a piece of fruit in a typical curvilinear shape, give it more edges to deconstruct its form and give it a more creative appearance.

A bird, for those beginners who'd like to try something a bit more daring

If the first two ideas seem a bit too simple for you, how about trying something a bit more advanced. You can choose a bird that you'd most like to sculpt (or that seems the easiest to mould) and also decide how much detail you'd like to add. If you're just starting out, we recommend that you just try to outline the main profile. If you'd like to push yourself a bit more, you could try to provide more detail by adding some texture to the wings, making the beak more detailed or carving the eyes. And of course, the more experienced you are, the bigger and more ambitious you can make your bird. If you'd really like to show off your skills and try something more challenging, the perfect option would be a peacock or an eagle.

Tools for making sculptures at home

Would you like to make your own sculptures at home? If so, we hope that these ideas have inspired you to start moulding and producing your next masterpieces to take pride of place in your home and give it an extra special touch.

At Rock & Tools, we have a wide range of tools that are perfect for both amateur sculptors and professionals. Don't hesitate to get in touch if you have any queries, and we would be delighted to help you with whatever you need.

Read more...
Page 3 of 4

Recomended products Stone carving tools